If you’ve ever wanted to bring a rocket to life using your smartphone, you’ll be surprised by how easy it is with Alight Motion. This powerful animation and motion graphics app allows beginners and experienced editors to create stunning scenes using simple shapes and effects.

In this tutorial, we’ll walk through how to animate a rocket flying through space, complete with exhaust flames, jitter motion, oscillation, and a dynamic star-filled background. By the end of this guide, you’ll have a professional-looking rocket scene that feels fast, smooth, and energetic perfect for intros, reels, edits, and YouTube motion graphics.
Let’s dive in!
Step 1: Creating the Base Rocket Layer
Every animation starts with a solid foundation. In our case, that foundation is a blank project with a single background layer.
01. Open Alight Motion and start a new project.
02. You will see an empty background layer—this is your canvas.
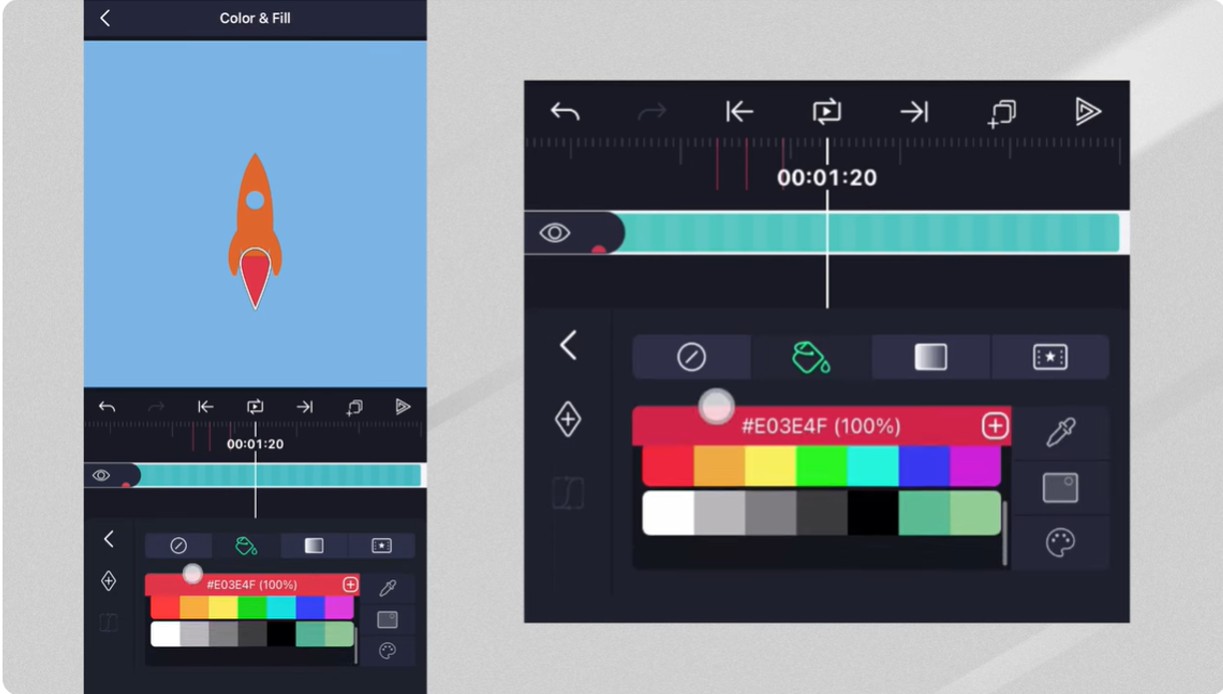
03. Tap Add Shape and scroll to find the built-in rocket shape. Alight Motion includes a simple but customizable rocket that works perfectly here.

04. Go to Color & Fill and adjust the colors to match your theme. You can choose bold colors like red and white, or go with minimalist shades for a flat-design look.
05. Rename the layer to “Rocket” for better organization.
06. Open Move & Transform and slightly scale down the rocket. This will give you more room around it for the exhaust and the animation movements.
07. Finally, extend the rocket layer’s duration to match your entire project length. This ensures the rocket stays visible throughout the animation.
08. At this point, you have a clean, simple rocket centered on the screen.
Step 2: Creating the Rocket Exhaust Flame
A rocket isn’t complete without that signature engine flame. This step brings energy and realism to your animation.
Add the Flame Shape
- Tap Add Shape again and choose the Teardrop shape.
- Move its pivot point to the top (the narrow side), which we’ll attach to the rocket.
- Rotate the shape 180 degrees so the pointed end faces downward.
- Position it directly under the rocket’s engine.
- Extend the teardrop layer to the end of the timeline.
- Tap Edit Shape and slightly adjust the teardrop to look more like a flame—narrow at the top and wider at the bottom.
- Change the color to white or a light yellow depending on your style.
Add Flame Animation
Instead of manually animating the flame, we’ll use effects.
- Go to Effects → Move & Transform → Pulse Size.
- The flame will now automatically pulse—no keyframes needed.
- Increase the frequency to make the exhaust move quickly, matching the intensity of a rocket engine.
Make the Flame Softer
To avoid sharp, unrealistic edges:
- Add Gaussian Blur from the Blur category.
- Adjust the blur value until the exhaust looks softer and more natural.
Add a Dark Flame Core
Real rocket exhaust is brighter on the outer edges and darker near the center.
- Duplicate the flame layer.
- Change its color to a darker shade like orange, blue, or grey.
- Slightly reduce the scale.
- Lower the opacity.
This creates a beautiful layered flame effect.
Step 3: Group the Rocket and Exhaust Layers
Now that the rocket and exhaust are complete, it’s best to group them.
- Select all rocket-related layers.
- Tap Group.
Grouping allows you to apply movement, jitter, and oscillation to the entire rocket instead of adjusting each part individually.
Step 4: Add Movement to the Rocket
A stationary rocket doesn’t look convincing. To create a realistic flight motion, we’ll apply three main animations: oscillation, jitter, and a manual position shift.

1. Add Vertical Oscillation
The oscillate effect simulates the gentle up-and-down motion of a rocket cutting through air.
- Go to Effects → Move & Transform → Oscillate.
- Change the angle so the movement goes up and down, not sideways.
- Increase the frequency slightly to make the motion faster and more dynamic.
2. Add Random Jitter
The jitter effect gives your rocket that powerful shaking motion rockets naturally have during flight.
- Go to Effects → Move & Transform → Random Jitter.
- Adjust the magnitude and frequency to make the rocket feel like it’s fighting resistance.
A small jitter adds realism; too much can make it look chaotic, so tune it as needed.
3. Animate Position Manually
For extra natural motion:
- Go to Move & Transform.
- Add a keyframe at the start and another at the end.
- Move to the middle of the timeline.
- Slightly move the rocket upward.
- Apply a smooth easing curve so the movement flows elegantly.
Your rocket now gently oscillates, jitter-shakes, and moves upward for a convincing flight effect.
Step 5: Create a Moving Star Background
No space animation is complete without stars flying past at high speeds.
Add The Star Field
- Tap your background layer.
- Add Simple Star Field from the effects list—it automatically generates stars.
- Add a position keyframe at the start.
- Move to the end of the timeline and drag the stars downward using the Y-axis.
Now, it appears as though the rocket is traveling upward.
Add Speed Streaks
To create the illusion of intense speed—almost like warp drive—we add streaks.
- Go to Effects → Blur → Linear Streak.
- Adjust the angle so the streaks point downward.
- Increase length and intensity until stars look stretched and fast.
Combined with the falling stars, these streaks give you a high-speed, cinematic effect.
Final Results
Press play and enjoy your creation. You now have:
✔ A smoothly animated rocket
✔ Realistic, pulsing exhaust flames
✔ Vertical oscillation and jitter for added realism
✔ Keyframe-based motion
✔ A starfield background with speed streaks
✔ A complete space-flight scene that feels alive
Your animation is now ready for exporting, sharing, or using in your projects.
Final Thoughts
Creating a rocket animation in Alight Motion is easier than it looks. With simple shapes, grouped layers, and a few effects, you can build a professional animation in minutes. Feel free to experiment with glow effects, custom colors, shadows, or even add planets in the background.
If you recreate this animation. And if you ever get stuck or want more tutorials, drop your questions in the comments—I’m always here to help!